Continuing with my habit of writing a flurry of posts before getting bored and not writing anything for a year….. welcome back! Since my last set of posts, among other things I’ve bought a house which means, obviously, I’m now spending a lot of time / effort on smart lighting and heating throughout the house which has eventually evolved into the node-red setup outlined here
There’s a few different platforms for smart ‘things’, the biggest open source one being ‘Home Assistant’ which is a fantastic piece of software which I just don’t seem to get on with. Tried it a few times, and in fact I originally started off this project using Home Assistant before deciding to go with a pure node-red solution. The main reason for that was I had problems with Tuya devices dropping off the network (which later turned out to be my wifi network, duh) but being able to setup new devices and link them together in a drag n drop fashion was a big draw.
And yeah, I could do what sensible people do and have the device level integration in home assistant and just offload some of the logic to node-red, but where’s the fun in that?
So, without further ado…… here’s my ‘setup’ flow in node-red:
Looks really clean right? Nice simple switch to light wiring. Yeah, now lets look at the actual logic behind that (more on how the setup screen fits in later)
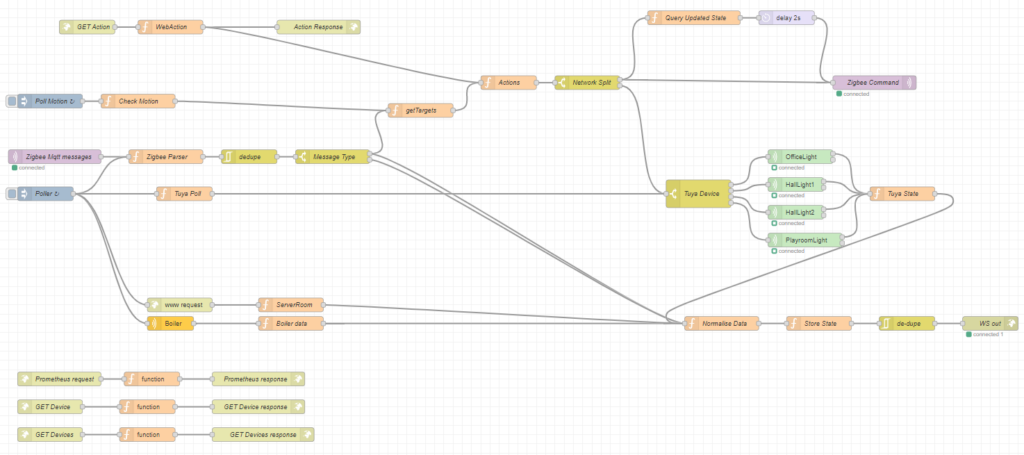
Ah, there’s the complexity. I won’t dig into this too much, but some interesting bits……

I’ve got a mix of devices in my house, zigbee switches, some zigbee bulbs and then some tuya wifi bulbs. For zigbee I’m using tasmota on a sonoff bridge which pushes all the zigbee messages in over Mqtt. In this little snippet I use a nodered function to parse the zigbee messages coming in and format them into useful objects. I then use the name of the device to determine what kind of device it is (I use a standard naming format which allows me to see whether something is a switch or a light or whatever). I also classify messages as ‘action’ or ‘state’ since zigbee devices send updates on their current state, as well as things like button pushes and so on. That ‘message type’ box at the end there splits messages off based on that type. State messages go into a global Map containing all current device state (see later) Action messages go for further processing…….
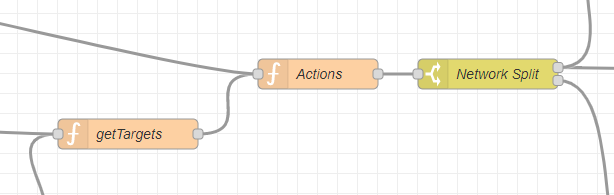
the action messages from the last snippet come in at the bottom left there and hit the ‘getTargets’ box. So we have a message coming in with something like ‘HallSwitch1’ with a presstype of ‘toggle’, how do we determine 1) which device(s) that action needs to go to and 2) for a toggle, do I need to turn the light on or off? For 1, I use a simple Javascript Map to store source and targets. It looks like this:
mapping = new Map();
mapping.set("HallSwitch1","LandingSwitchMiddle_2");
mapping.set("HallSwitch2","LandingSwitchMiddle_2");
mapping.set("SpareSwitch","LandingSwitchMiddle_3");
mapping.set("OfficeSwitch","OfficeLight");
mapping.set("EdenSwitch","EdenLight");
mapping.set("OfficeMotion","OfficeLight");
mapping.set("PlayroomSwitch","PlayroomLight");
mapping.set("LandingSwitchMiddle_2","HallLight1,HallLight2");
mapping.set("LandingSwitchMiddle_3","LandingLightBack");
global.set("mapping",mapping);
(Originally, I was just setting up this mapping in a function block ‘on start’, but I’ve recently come up with a better way of doing it, we’ll come back to this later). You’ll notice a couple of things here, I sometimes trigger switches with other switches. I do that when I’m using wired wall switches which have a light to indicate whether they’re on or not. By triggering the wired switch rather than directly triggering the bulb I make sure the indicator on the switch always matches the bulb state. Also, I can map a switch to multiple bulbs by seperating them with a comma, in this case the ‘Actions’ node then outputs multiple messages.
The ‘state’ of the art
The toggle / state problem is only a problem because I use a mix of bulbs. If I was using just zigbee bulbs I think you can just tell them to toggle and they do it, but the tuya bulbs need on or off, which requires a bit more node-red magic. The ‘Actions’ function box handles this, by getting the current state of the target (from the global state map) and then determining whether we need to turn it on or off to toggle it.
The Action box also determines which network a message is destined for (tuya or zigbee) by looking at the target, and then creates a message in the correct format for that network. The ‘network split’ box at the end there then routes the messages accordingly. Zigbee messages go straight back into the mqtt broker and onward to the zigbee network via the bridge. For tuya devices there’s one more step…..
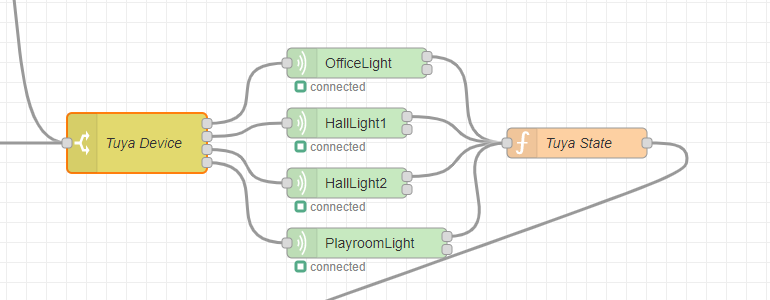
This is more an implementation thing, but the plugin I’m using for tuya devices requires a seperate node for each device in node-red, so here’s where I split the messages out for each device. You can also see a state function block at the end, that captures the response from the tuya devices and feeds them into the global state Map. That Map is also used to provide an API, via a REST call and also via websockets for updates….as you can see here:
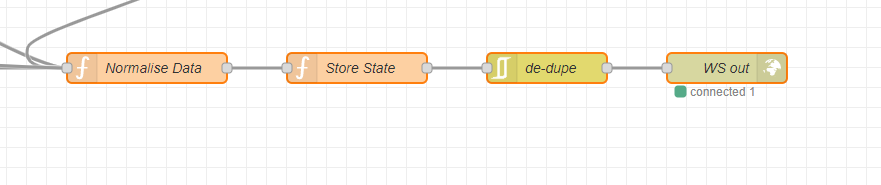
You can see the WS out there, every time the state changes (either from a zigbee message or a tuya response, both feed into that ‘Normalise data’ block) a websocket message is pushed out with the updated info, which my web client uses to update it’s view. Speaking of web clients….
Web requests
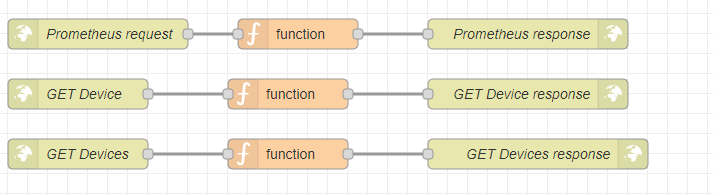
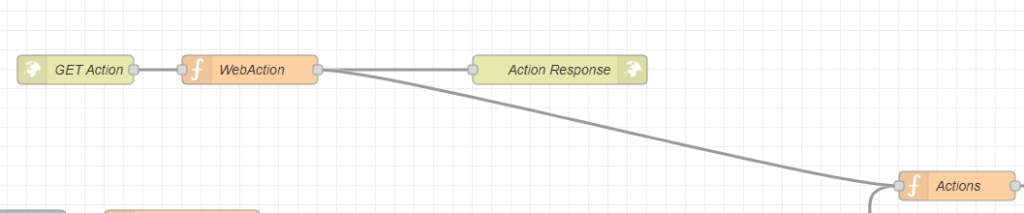
Here’s where I handle web requests. I already use prometheus & grafana for monitoring server related timeseries data, so pushing data from my smart devices in there seemed useful (mostly temperature data, which I haven’t covered in this post, but it all just comes in as zigbee state messages). The get device / devices just output a json representation of the global state map, and the ‘Get action’ at the bottom there is used to switch lights on / off and other actions from the web client.
drag n drop
Okay, so that’s how all the backend logic works but wait, none of that allows me to just drag and drop devices on a page and wire them up together right? Well, remember the setup flow I started with? And the Map I use to configure devices? With the magic of a node-red function, I can use a flow to setup the map. Here’s how it works:
The ‘on start’ for my function node looks like this:
function startUp(){
    globalState = global.get("mapping");
    if (globalState == undefined){
        globalState = new Map();
    }
    globalState.set(node.name,"");
    global.set("mapping",globalState);
}

function sendMsg(){
    node.send({topic:node.name});
}

if (node.name.includes("Light") === false){
    setTimeout(startUp,100);
    setTimeout(sendMsg,300);
}
This fires whenever the node is is deployed and does a couple of things but only if the node name doesn’t have ‘Light’ in it. Devices with ‘Light’ in the name come at the end of a ‘chain’, so we never map them to a target device.
For other devices that can be mapped to a target device, first off, we wait 100ms. This is important because I have a ‘reset’ function in the same flow that wipes out the global mapping from previous deployments so I know we’re starting fresh. Then we write the nodename into the global map as a key, with an empty value.
Next, after 300ms we send a message with an empty payload and the topic set to the node name. Why? Well, lets take a look at the ‘on message’ bit of the same function node.
mapping = global.get("mapping");
if (mapping == undefined){
    mapping = new Map();
}

currentMap = mapping.get(msg.topic);
if (currentMap == undefined){
    currentMap = "";
}
if (currentMap !== ""){
    currentMap += ",";
}
currentMap += node.name;

mapping.set(msg.topic,currentMap);
global.set("mapping",mapping);
So, when that message is received by a node wired to the output, the target node updates the global mapping with its own name, mapped against the key from the source node.
Now all I need to do is copy & paste whenever I add a new device, change the name on the node, wire it up and redeploy.
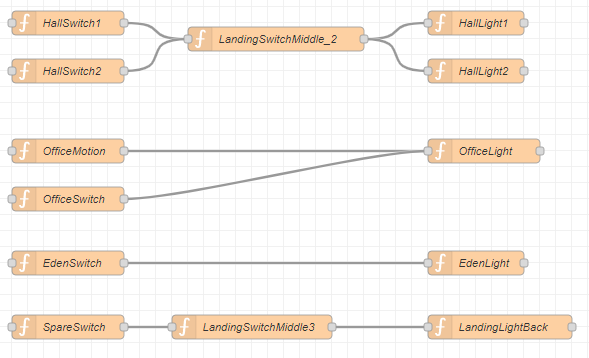
This works great even with things like this:

Here I’m using 2 wireless switches to toggle the state of a wired (stateful) switch, which then switches 2 lights on and off. The Map produced by these nodes looks like this:
LandingSwitchMiddle_2: "HallLight1,HallLight2"
HallSwitch1: "LandingSwitchMiddle_2"
HallSwitch2: "LandingSwitchMiddle_2"